
A BallotBox Voter is data that represents one person who is authorized to cast a ballot in a Poll. The most important data item is the Voter's email address, as that is used as the unique identifier for the Voter and is usually the primary means that Registrars have to contact the Voter. The name of the Voter is optional, but having at least a given (first) or family (last) name for each Voter is highly recommended.
The system also maintains a status for the Voter, the Poll with which they are associated, the date they last voted, a unique string termed the Voter Key that is used to access their ballot, and another string called the Ballot Hash that can be used to validate their vote in the Poll.
For Open/Public ballots, the details of the Voter's ballot are available, can be matched to the Voter and can be viewed by Registrars. For Secret/Anonymous ballots, the details of the Voter's ballot cannot be associated with the Voter.
Voter registrations and the data from ballots that Voters cast are private to a specific Poll and cannot be seen or used by other Polls. Voter data is managed by a separate interface, however, as discussed in this page.
To add, update, or view Voters for a Poll, you must first open the Poll using the Poll Maintenance interface. Once you have selected the Poll from your Poll list and opened its main panel, click the Maintain Voters button on that panel. This will open a new window or tab in your browser that shows the Voter List for that Poll.
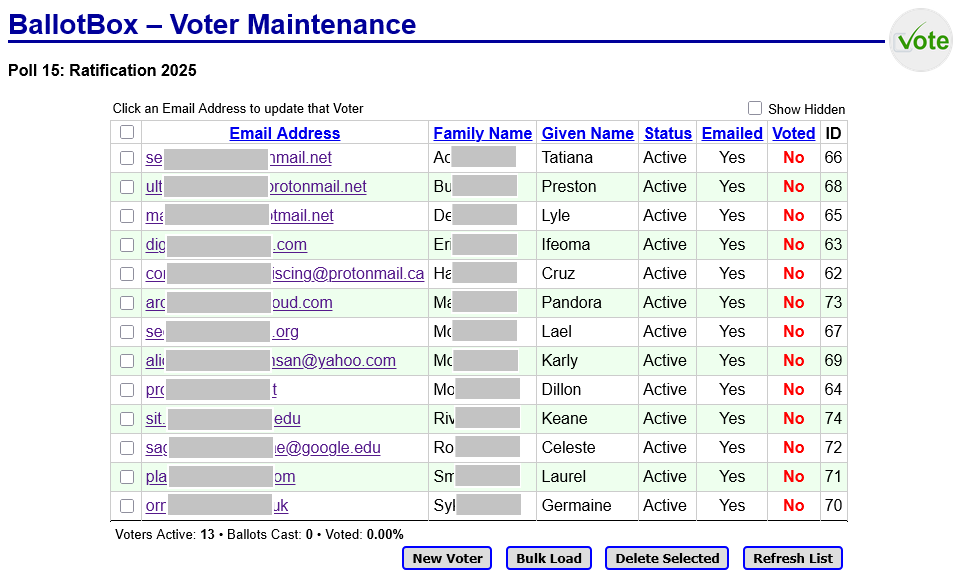
When you first create a Poll, this list will be empty. See Creating Voters below for instructions on adding Voters to your Poll. Registrars can see and manage only their Polls and Voters. Administrators can see and manage all Polls and Voters in the system.
The list displays the following data for each of your Voters.
Most of the column headings on the list are formatted as links. Clicking one of those links will sort the list in ascending order by the values in the cells of that column. This list is initially ordered by Family Name and Given Name.
The rows of the list are shaded according to the status of each Poll. Rows for Active Voters have a white background; rows for Inactive Voters have a gray background.
To view or update the properties of a Voter, click the Email Address of the Voter, which is formatted as a link. That will open a panel on top of the list that shows the properties and allows you to update them. The panel also has a number of buttons to perform management functions. That panel and its use is discussed in detail in the next section.
Below the list of Voters are four buttons:
In the upper-right of the Voter list is a check box, Show Hidden. By default, Voters that are in inactive status are not shown on the list. Ticking this check box will cause such Voters to appear.
There are two ways to add Voters to your Poll:
When you click the New Voter button under your list of Voters, the page will open a panel on top of the list. That panel has a few fields that you fill in to create a new Voter. This panel is termed the "Voter Main Panel." In addition to adding a new Voter to your Poll, it is also used to update existing Voters.
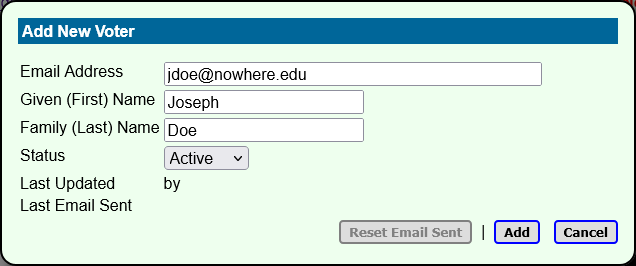
The Voter Main Panel has the following fields:
The remaining fields on the panel are filled in by the system once the Voter is added to the Poll. Once you have filled in the necessary fields, click the Add button to create the Voter record. To exit the panel without adding the Voter, click the Cancel button. In either case, the panel will close. If a new Voter is added, the Voter List will refresh automatically to show the new entry.
If you have a lot of Voters to add to your Poll, it is usually easier to prepare the data off line and load the data all at once rather than using the main panel above to load them individually. You can also update existing Voters this way if their email addresses in your off-line data match the email addresses of Voters already on file. Only a Voter's First and Last Names can be changed when using Bulk Load, however.
The data you prepare must be plain ASCII text in CSV (Comma Separated Value) or TSV (Tab Separated Value) format. Each line of text in the file represents one Voter. The lines may be delimited by:
On each line of the data, the Voter information consists of three variable-length fields delimited by comma (,) or horizontal tab (ASCII hex 09) characters. The fields must be in this exact order:
You must specify an email address, but the other two fields are optional. If you omit the Given Name but not the Family Name, you must still include a comma or tab for the Given Name field. If any of the fields contains a comma, you must enclose that field in double-quotes ("). Spaces surrounding a comma or tab are optional and are ignored. Any text on a line after a third comma or tab delimiter is ignored. Completely blank lines are also ignored.
The first line in the data must contain column headers with these exact column names, which are case-insensitive:
email, first, lastThere are two ways to prepare the CSV/TSV data:
Once you have the data prepared, click the Bulk Load button on the Voter List. That will open a panel on top of the list that looks like this:
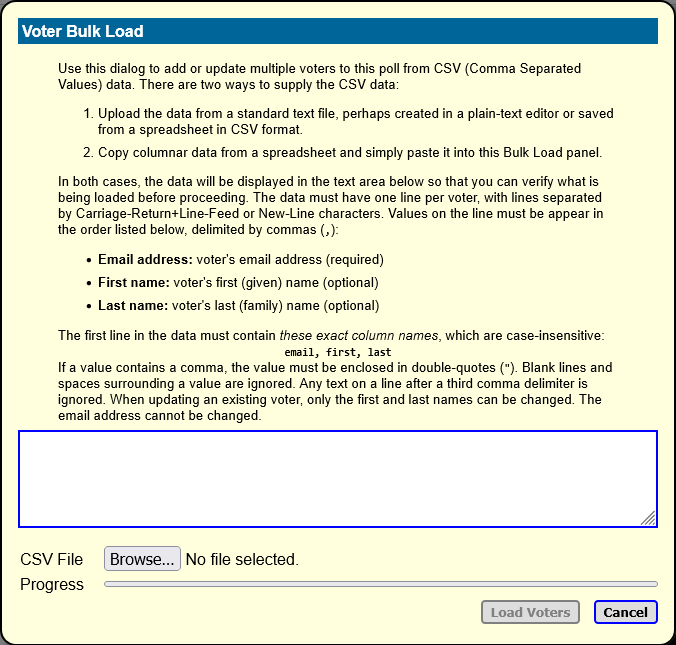
There are now two ways to load your Voter data into the panel.
Using either method, your Voter data will appear on the panel in the text area having the blue border. You can examine this text area to confirm that you uploaded or pasted the correct data. You can also make small corrections to the data in the text area, although they cannot be saved from there. You can also add the column-header line in front of the data at this time if it was not included in the data you uploaded or pasted.
Next, click the Load Voters button at the bottom of the panel. The page will validate the format of the data you supplied and report any errors that it finds. If there are errors, you can correct them in the text area and try again.
If there are no formatting errors, the page will send the data to the server, where it will be posted to the data base. If the server detects any errors during the posting process, they will be displayed in your browser, but all lines of Voter data that did not have errors will still be processed. As individual lines of Voter data are processed, the progress bar at the bottom of the panel will advance to the right, showing the proportional number of lines processed.
Once posting of the Voter data completes, the page will briefly display a summary showing the number of Voter lines posted and the number with errors. If the posting completes without any errors, the Bulk Load panel will close and the Voter List will refresh automatically.
During the posting process, the server checks each email address to see whether that Voter is already on file. If so, the existing Voter's data is updated rather than a new Voter created. Note that only the Given and Family name fields can be updated, however.
To update the data for a Voter, click the Voter's email address link in the Voter List. The same main panel that is used for creating Voters will open and display the data for the selected Voter. The button in the lower-right corner of the main panel will read Update instead of Add New. Once a new Voter is created, its main panel will automatically change its mode from create to update.
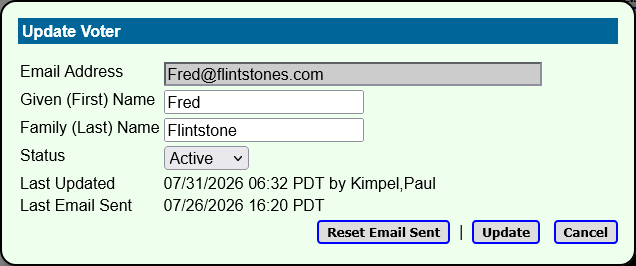
Make any necessary changes to the fields on the panel and then click the Update button to save them in the data base. Note that the Voter's email address field is disabled and grayed-out. It cannot be changed. If you make changes and then decide not to save them, click the Cancel button. Both buttons close the panel.
At the bottom of the panel is a button labeled Reset Email Sent. Clicking this button will reset the indication that an email has been sent to that Voter. This allows the system to send another email to the Voter the next time you send emails from the Poll Main Panel when you specify the Send To option on that panel as "Only Voters not previously sent." The reset happens immediately – you do not need to click the Update button on the Voter update panel afterwards.
Revised 2026-08-09