
A BallotBox Poll is comprised of a set of data structures that define one election or survey. It contains description and configuration data about the Poll, scheduled voting open and close dates, a template for an email message to be sent to voters, and the actual voting data once votes are cast.
The Poll structure does not contain the set of questions that Voters will respond to, however. The questions and response choices are maintained in a separate data structure termed a QuestionSet. What Polls contain is a link to their QuestionSet. This arrangement allows multiple Polls to share the same QuestionSet.
Voter registrations and the data from ballots that Voters cast are private to a specific Poll and cannot be seen or used by other Polls. Voter data is managed by a separate interface. You can open the Voter Maintenance interface from the Poll Maintenance interface, however.
When the Administrators authorized you as a Registrar for the BallotBox site, you should have received an email with a link having a "?X=" parameter. You access the Poll Management interface by first navigating to the BallotBox web site in a browser using that link. If you do not have a link, or have lost it, contact the Administrators by sending an email to the support address cited at the top of this document. After validating your link, the site will display the BallotBox Home page.
On the Home page, click the Manage Polls link. This will display a list of your currently-active Polls. Initially, this list will be empty. See Creating a Poll below for instructions on creating your first Poll.
Registrars can see and manage only their Polls. Administrators can see and manage all Polls in the system.
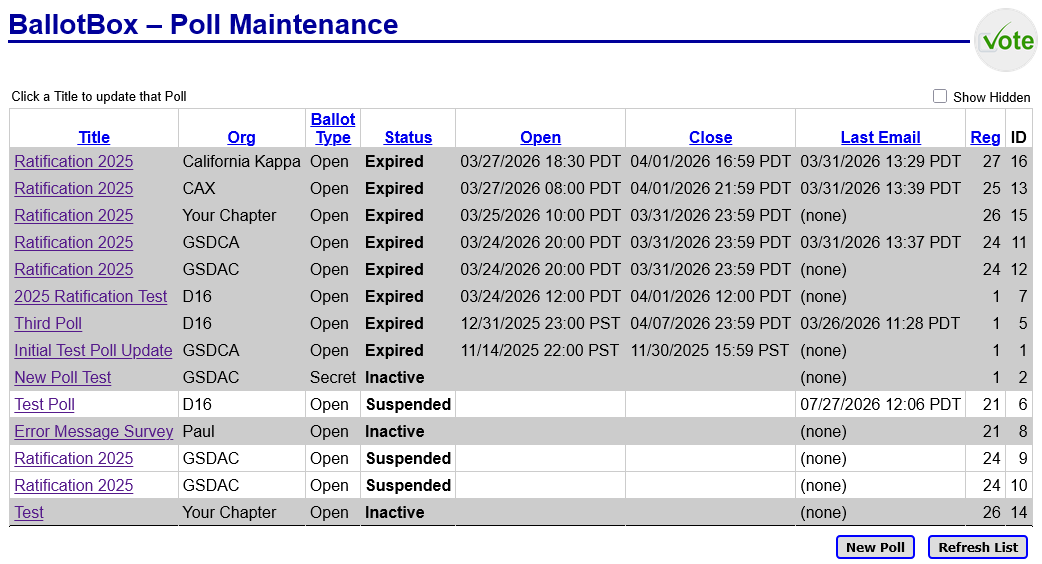
The list displays the following data for each of your Polls.
Most of the column headings on the list are formatted as links. Clicking one of those links will sort the list in ascending order by the values in the cells of that column. This list is initially ordered by Registrar ID and Title.
The rows of the list are shaded according to the status of each poll as discussed in the next section:
To view or update the properties of a Poll and perform various management functions, click the Title of the Poll, which is formatted as a link. That will open a panel on top of the list that shows the properties and allows you to update them. The panel also has a number of buttons to perform management functions. The following sections of this document discuss the contents of that panel and its use in detail.
Below the list of Polls are two buttons:
In the upper-right of the Poll List is a check box, Show Hidden. Polls that are in inactive status and have not been updated in more than a year are not shown on the list by default. Ticking this check box will cause such Polls to appear.
To return to the Home page, click the "Vote" icon at the top of the list page.
There are two sets of data that are associated with a Poll but are maintained separately from it – a QuestionSet and the Voters registered for the Poll.
The QuestionSet specifies the questions on which votes will be cast and the acceptable responses to those questions. There are two types of QuestionSet, shared and private. Shared QuestionSets are created and maintained by Administrators. Any Poll can use a shared QuestionSet, but only Administrators can make changes to them. Private QuestionSets are created and maintained by individual Registrars. Private QuestionSets can be shared by any number of that Registrar's Polls, but other Registrars cannot see or use your private QuestionSets.
Since QuestionSets are created and maintained separately from Polls, it is usually easier to have the QuestionSet available before you create a Poll that will be using it, either by creating a new QuestionSet or linking to an existing one. This is not a requirement – you can create a Poll without assigning a QuestionSet to it, but voting cannot occur until the Poll has a QuestionSet. Registrars can change the QuestionSet used by a Poll up to the point that voting opens, but once votes are cast, the QuestionSet assignment can no longer be changed.
When you click the New Poll button under your list of Polls, the page will open a panel on top of the list. That panel has a number of fields that you fill in to create a new Poll.
The panel that opens when you click the New Poll button below the list of Polls, or when you click the Title cell for an existing Poll in the list, is termed the "main Poll panel." From that panel you click buttons that open other panels, so calling it "main" distinguishes it from those other subordinate panels.
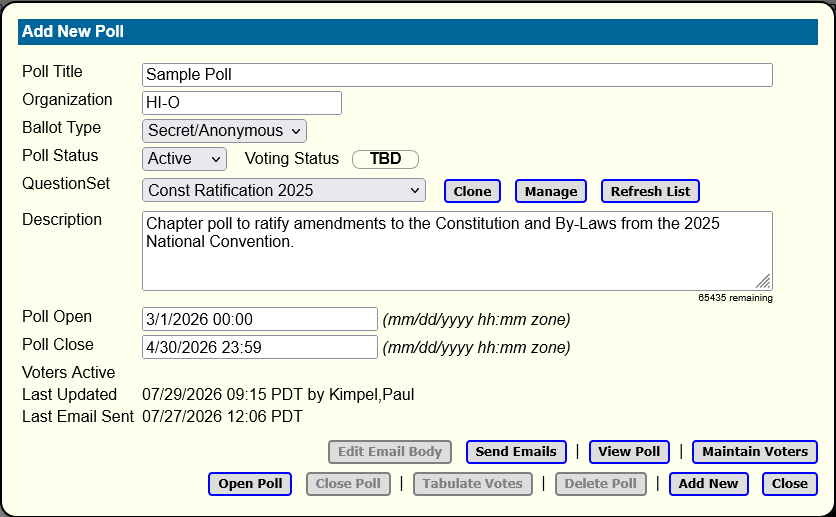
The main panel has the following fields:
Below the Poll fields on the main panel are a collection of buttons used to perform various Poll management functions. For the purpose of creating a new Poll, only two of them are relevant, Add New and Close.
The button in the lower-right corner of the main panel will read Add New when you are creating a Poll. Clicking that button will validate the data on the panel and insert the new Poll into the data base. The same main panel is used when updating an existing Poll, but the button instead will read Update and will save your changes. In neither case does the button close the main panel.
The Close button closes the main panel and returns to the list of Polls. If you have made changes to the Poll data that would be lost by closing the panel, the page first requests confirmation that you want to discard those changes. Canceling that confirmation message leaves the panel open.
All of the buttons on the main panel are summarized below and discussed more fully in their respective sections of this document.
To update the data for a Poll, click the Poll's title link in the Poll List. The same main panel that is used for creating Polls will open and display the data for the selected Poll. The button in the lower-right corner of the main panel will read Update instead of Add New. After creating a new Poll, the main panel will automatically change its mode from create to update.
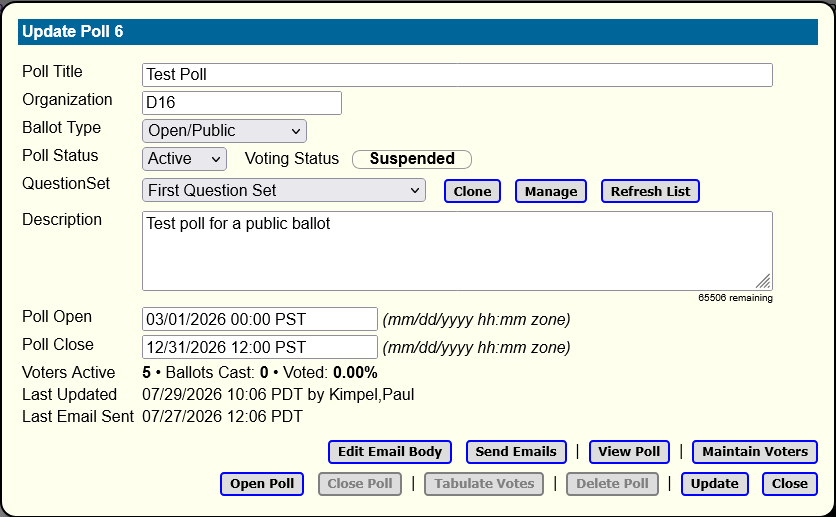
Make any necessary changes to the fields on the panel and then click the Update button to save them in the data base.
Some of the Poll data is modified by clicking other buttons at the bottom of the panel. Many of those buttons open subordinate panels on top of the main panel. Any changes made to the Poll on those subordinate panels will be saved when you exit those panels. If those changes are the only ones you make after opening the main panel and you have not changed any data on the main panel itself, you do not need to click the Update button on the main panel before closing it.
You can change any of the data on the main panel at any time, with the following exceptions:
Note that while the QuestionSet assigned to the Poll cannot be changed once ballots have been cast, the questions and choices of the assigned QuestionSet can be changed at any time. Such changes must be made with extreme care, however, as they could alter the meaning of the questions and voters responses or invalidate some of the data for ballots already cast. Registrars are responsible for whether any changes to a QuestionSet's contents would alter meaning or validity of ballots already cast.
Voters cast their ballots on the BallotBox site by accessing the site using a customized link that uniquely identifies them to the site. The Voter then clicks or otherwise activates that link, the site displays the Voter's ballot in their browser, the Voter responds to the questions, and then submits their completed ballot, which the site stores in its data base for later reporting.
Thus, in order to vote, the Voters need to receive their customized link. The typical way that is done is through an email message. In order to register a Voter for a Poll, Registrars must provide the Voter's email address. The site can use that email address to send messages to selected groups of Voters for a Poll, e.g., all Voters or all Voters who have not yet voted.
The site has a tool that allows Registrars to compose the body of email messages that are sent to Voters. Once that email body has been established, a Registrar simply tells the site to send emails to the appropriate group of Voters. It combines each selected email address with the text of the body, constructs an email message, and sends the resulting messages in one step.
The text of this message body can include special keywords that the site will replace with data about the Poll or Voter. This allows Registrars to customize the emails for the Poll and for each voter, similar to the way that mail-merge works in a word processor. One of the keywords you can insert into the message body is replaced by the Voter's customized link for accessing their ballot.
To access the tool for composing these message bodies, click the Edit Email Body button at the bottom of the Poll's main panel. When you create a new Poll, this button is initially disabled. You must first enter the basic Poll data and click the Add New button to establish the Poll in the data base. Once that is done, the Edit Email Body button will be enabled and you can compose the body.
Clicking the Edit Email Body button opens a larger panel on top of the main panel that has an area occupying most of the panel for entering and editing text, along with several controls at the bottom. If the Poll does not yet have an email body, the page will display a sample one that you can use as is, or you can modify or replace it according to your needs. Note that the sample text is not saved automatically – you must click the Update button on the body panel in order to save the initial body.
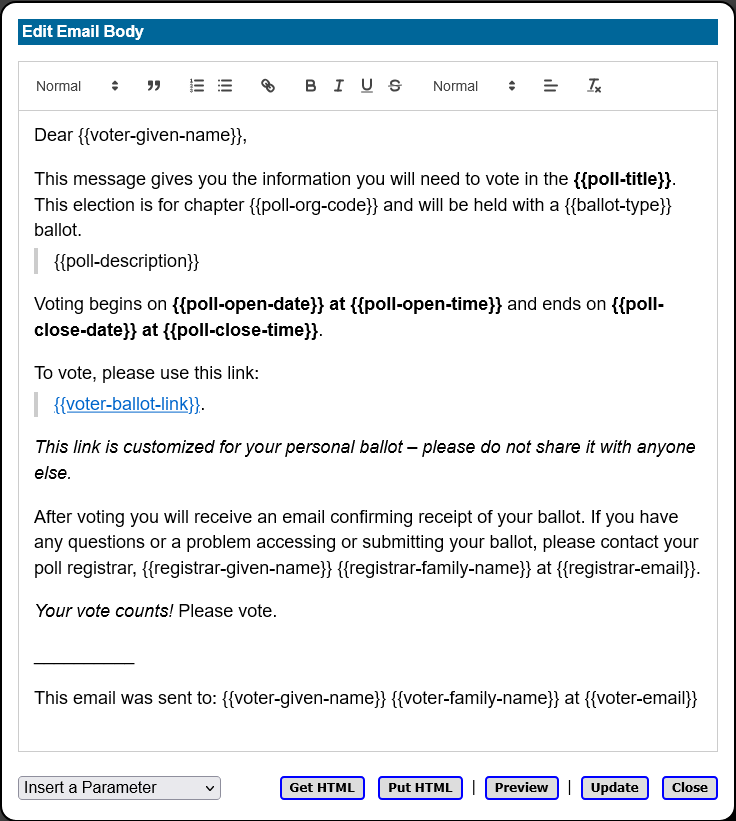
The large text area is a "rich text" editor, meaning that in addition entering plain text, you can apply the following types of styling to the text using the tool bar at the top of the text area:
To customize the email body for a specific Poll and Voter, you enter special keywords in the text. These keywords will be replaced by the corresponding Poll or Voter data when the site generates the individual email messages. The keywords are distinguished from literal text by enclosing them in double curly braces, e.g.,
{{ keyword }}
Spaces between the inner braces and the keyword are optional; spaces between the two opening or closing braces are not allowed; spaces outside the braces are taken literally.
Here is a short example of body text with some embedded keywords:
Voting begins on {{poll-open-date}} at {{poll-open-time}} and ends on {{poll-close-date}} at {{poll-close-time}}.
To vote, please use this link:
{{voter-ballot-link}}
After voting you will receive an email confirming receipt of your ballot.
The bold and italic styling are applied simply by selecting the keyword and its enclosing braces and then clicking the respective style buttons in the tool bar.
To format a link so that the Voter sees anchor text instead of the link URL, first enter the anchor text into the body, then select that text and click the link button in the tool bar. In the small dialog box that pops up, enter "{{voter-ballot-link}}" in its text box and click the Save button, which will close the dialog.
The following table shows all of the keywords that can be used when composing email bodies. "Given Name" is commonly called "First Name;" "Family Name" is commonly called "Last Name."
| Keyword | Description |
|---|---|
| Poll Data Keywords | |
| {{ballot-type}} | Ballot Type (Open/Secret) |
| {{current-date}} | Current Date |
| {{current-time}} | Current Time |
| {{poll-close-date}} | Poll Close Date |
| {{poll-close-time}} | Poll Close Time |
| {{poll-description}} | Poll Description |
| {{poll-open-date}} | Poll Open Date |
| {{poll-open-time}} | Poll Open Time |
| {{poll-org-code}} | Poll Org Code |
| {{poll-title}} | Poll Title |
| {{registrar-email}} | Registrar Email Address |
| {{registrar-family-name}} | Registrar Family Name |
| {{registrar-given-name}} | Registrar Given Name |
| Voter Data Keywords | |
| {{voter-key}} | Voter Ballot Key |
| {{voter-ballot-link}} | Voter Ballot Link |
| {{voter-email}} | Voter Email Address |
| {{voter-family-name}} | Voter Family Name |
| {{voter-given-name}} | Voter Given Name |
| {{voter-email-date}} | Voter Last Email Date |
| {{voter-email-time}} | Voter Last Email Time |
To make it easy to use keyword parameters, the drop-down list at the bottom of the panel lists all of the keywords by their description. To insert a keyword, simply select the insertion point with your pointing device and choose one of the entries from that list. The insertion works like a paste from the clipboard, so if you have a string of text selected, that selection will be replaced by the keyword and its enclosing braces.
To save the email body, click the Update button at the bottom of the panel. The body text with your keyword parameters will be stored in the site's data base. The panel will not close. If your body text does not contain at least one {{voter-ballot-link}} or {{voter-key}} parameter, the voter will not have any way to access their ballot, and the page will request that you confirm you want to save the body text without one of those parameters.
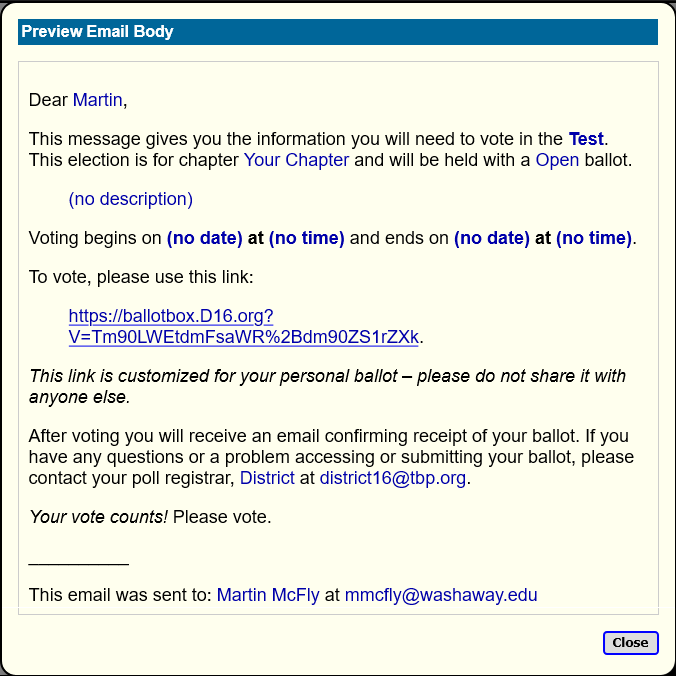
You can view a preview of what the email body will look like when it is sent to a Voter by clicking the Preview button at the bottom of the panel. This will open a new panel on top of the editor panel displaying the body text, with the poll-oriented keyword parameters replaced by values for that poll, and voter-oriented parameters by sample values. The replaced-parameter text will have a dark blue color. Click the Close button at the bottom of this panel to close it and return to the body editor.
The system stores only a single email body in its data base. If you need to send Voters more than one type of email, you can extract the body text as HTML from the rich-text editor to your local system's clipboard and paste it into a text editor for saving as a file on your local system. Later you can copy that text from the file and restore it into the rich text editor. Using this technique, you can externally maintain as many email bodies for the Poll as you wish.
These extract and restore operations are performed using the remaining two buttons at the bottom of the editor panel:
Proper functioning of the rich-text editor is dependent on correct formatting of the HTML text and the style information embedded in that text that the editor uses. For that reason, it is best not to attempt to modify the body outside of the rich-text editor and to use the Get HTML and Put HTML buttons only to transparently save and restore the body text.
In order to send emails to voters from BallotBox you must (a) create the email body text as described in the previous section and (b) register Voters in the system. To register Voters, see the Managing Voters page.
Once you have an email body on file and Voters registered, you can send emails to the voters by clicking the Send Emails button on the Poll's main panel. That will open a subordinate panel on top of the main panel.
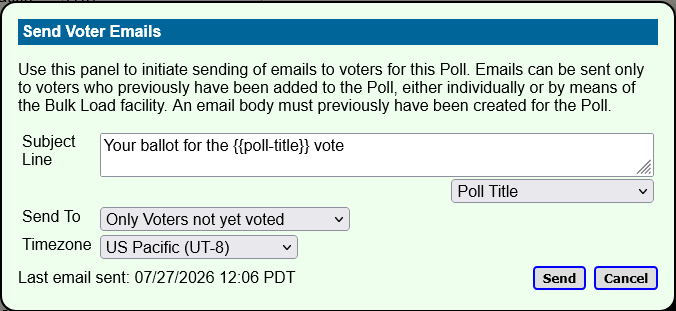
On this panel you can specify the following:
After entering these values, click the Send button at the bottom of the panel to initiate sending the emails. Once the emails have been generated by the system and delivered to its mail server, the number of emails sent will be displayed, the last-send date and time will be updated, and the Send To list will reset to send emails only to those who have not yet been sent one.
The Cancel/Close button closes the email panel. When the panel is initially opened, the button will read "Cancel". Once emails have been sent, the button will change to "Close" to indicate that a send has taken place. The email panel remain opens until closed with this button.
Each time that emails are successfully sent to Voters, the contents of the Subject Line text box are saved in the data base. Each time the email panel is opened, any saved subject line text will be restored to the text box. Only the subject line last sent is saved and restored, however.
Note that any indication of successfully sending the emails means only that they were successfully received by the site's email server. It does not indicate that any emails actually reached the addressee. Delivery to the addressee could take some time and in some cases (e.g., an invalid email address or full inbox) may not be possible. There is no way to determine whether the addressee actually received an email without asking them.
The information for a Poll and its ballots is distributed across the Poll Management and QuestionSet Management interfaces. In order to examine the complete package and see the data in a form similar to what a Voter will see, the site provides a composite view that can be used for review and proofreading.
To access this composite view, click the View Poll button at the bottom of the Poll's main panel. This will open a large panel on top of the main panel that fills the entire window.
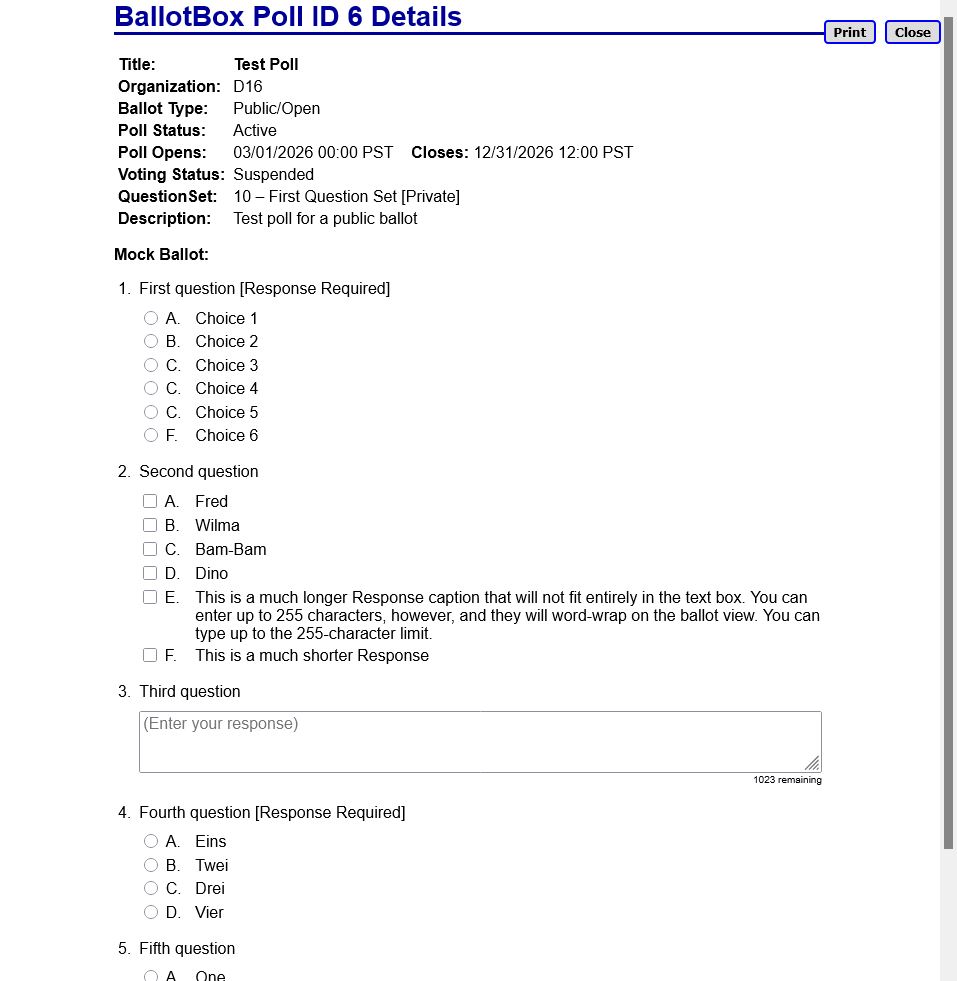
At its top, the panel shows the following items:
Voters will see the Poll title, Ballot type, Poll description, and Poll closing date/time on their Ballot. The other items are not shown to the Voter.
Below those items on the view panel, the Questions and Choices from the Poll's QuestionSet are formatted as a mock ballot, very similar to what the Voter will see on their actual ballot. Each Question is listed followed by that Question's Choices for response.
These selection controls are active on the view panel and you can play with them to see how they will work for the Voters. The controls are just for evaluation, however, and there is no way to save their selections.
In the upper-right corner of the view panel is a button, Print. Clicking this button opens your browser's print dialog. You can use this to print a copy of the Poll information and mock ballot for review. Most browsers can also generate a PDF document from their print dialog.
When you are finished with the view panel, click its Close button to close the panel and return to the main panel.
Once you have a Poll created, have associated a QuestionSet with it, and have registered Voters, you are ready to conduct the vote. The voting process involves the following steps:
Open the Poll
You open a Poll for voting by clicking the Open Poll button on the Poll's main panel. There are four conditions that determine whether a Poll can be opened for voting:
If all of these conditions are met, then clicking Open Poll button will open the Poll for voting. The Voting Status indicator on the Poll's main panel will change to "Voting" and be highlighted in green. The Open Poll button will be disabled and the Close Poll button will be enabled.
Just because the Poll has been opened does not mean that ballots can be accepted. however. The following conditions also must be met at the time the ballot is received:
You can open and close a Poll as often as you wish. If you discover a problem while voting is in progress, you can temporarily close the Poll to inhibit further voting until the problem has been resolved.
Send Emails to Voters
Typically, you will want to send emails to Voters either before or at the time the Poll is opened for Voting. The one thing that registered Voters need in order to vote is the link to their ballot.
Sending emails is a convenient way to send Voters their ballot link and provide information about the Poll. The BallotBox site provides an easy way to do that, but any other method that will give Voters their ballot link and the information they will need to cast a ballot successfully can be used.
You can send emails from the BallotBox site at any time after the Poll has been created and you have registered Voters for the Poll. You are not restricted to sending emails only once or to having only one message. You can compose and send multiple different email messages and automatically customize those emails with Poll and Voter information as described in the Composing Voter Emails section above.
You can also send the same email message as many times as desired. Each time you send emails, you can vary the subject line of the email and select which set of Voters is to receive the email – all Voters, only those Voters who have not yet received an email (e.g., recently-registered Voters), or only those Voters who have not yet voted. That last option is especially useful if Voter response is low and you need to remind those who haven't voted yet to do so. See the Sending Emails to Voters section above for more information.
Desirable items to include in an email to Voters are:
Monitor Progress of Voting
Once the Poll is opened, Registrars can monitor the number of ballots that have been cast. There are two places on the site where that can be done:
Registrars can also generate a report of voting results at any time by clicking the Tabulate Votes button on a Poll's main panel.
If Voter participation is lower than desired, Registrars may want to contact individual Voters and encourage them to vote. One way to do that is to use the BallotBox email-sending mechanism and select that emails should be sent only to Voters who have not yet voted.
Sometimes it is necessary to extend the voting period to allow Voters more time to cast their ballots. The Poll's closing date/time can be changed at any time to accomplish this.
Close the Poll
Once voting has completed, the Registrar should close the Poll. There are two ways to do this:
Every Poll should have a closing date/time specified, unless the Poll is specifically intended to stay open indefinitely.
Once voting has completed, it is good practice for the Registrar to manually close the Poll, even if the closing date/time has passed. Once the reporting of results and other post-vote processing is completed, it is also good practice to change a Poll's status to Inactive. This will prevent the Poll from being accidentally reopened again. It will also highlight the Poll on the Registrar's list of Polls in gray, indicating the Poll is no longer in active use.
Also, a Poll in Inactive status will no longer be shown on the Poll List by default once it has not been used for at least a year. These older, inactive Polls can be included on the list if the Show Hidden check box at the top of the list is ticked, however.
Tabulate Ballot Votes
To view summary ballot results for a Poll, click the Tabulate Votes button on the Poll's main panel to view statistics on how each question on the Poll was answered. See the next section for details.
The BallotBox site provides a report that summarizes Voter responses for each question on a Poll's ballot. To view the report, click the Tabulate Votes button on the Poll's main panel. This report can be run at any time, even while voting is currently in progress.
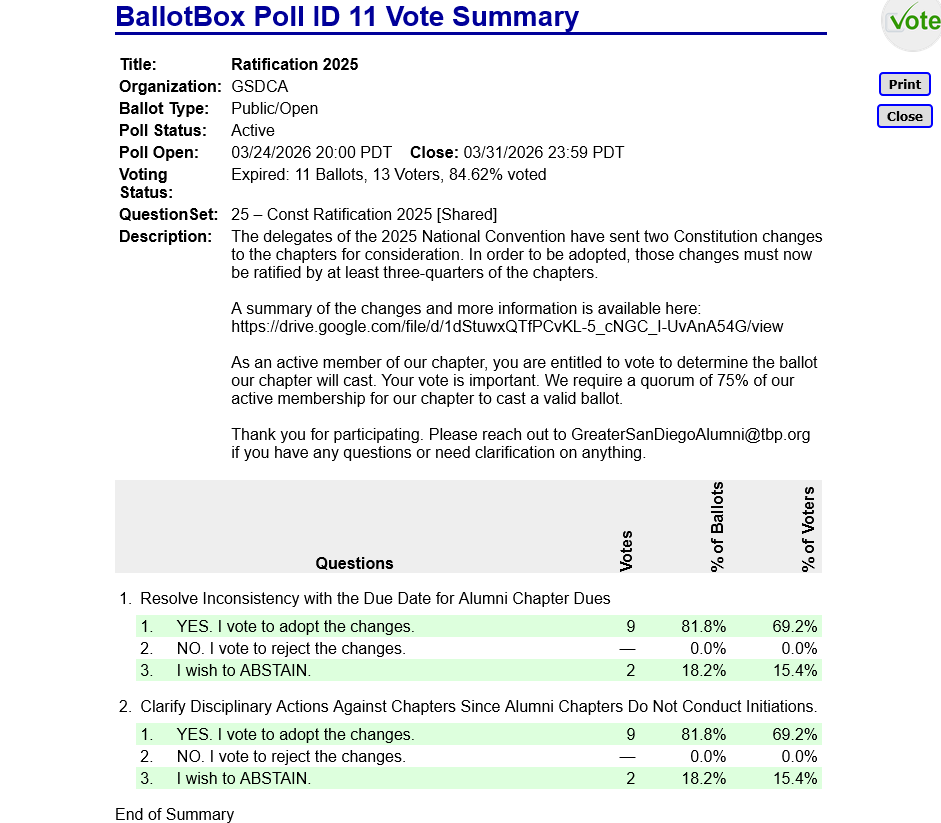
Clicking that button generates the report and opens it in a new tab or window of your browser. The report has a format similar to the mock ballot displayed by the View Poll button on the main panel. The top matter of the page shows the number of registered voters, the number of ballots cast, and the percentage of ballots to voters to help determine whether quorum has been met.
The report does not show the radio buttons, check boxes, and text boxes of the mock ballot. Instead, to the right of each question's responses are three columns showing the total number of votes for that response, the percentage of that number with respect to the number of ballots cast, and the percentage of that number with respect to the number of voters registered for the Poll.
For those questions requesting a textual response, the individual responses are listed in random order below the question. There is no indication of which Voter supplied which response.
You can print this report by clicking the Print button at the top of the page. When you have finished with the report, click Close at the top of the page, or simply close the tab or window in the browser.
Revised 2026-08-07